Traditional machining processes for cylindrical components typically involve two approaches.
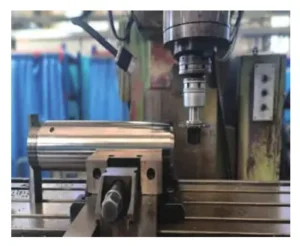
The first approach, as shown in Figure 1, involves milling end face grooves and CNC machining damping holes, usually requiring two main operations to complete.

First, secure the cylinder barrel component in the vise of a conventional milling machine.
Using a T-slot cutter (tool specifications: Φ80×10), perform rotary machining to complete the end face groove (see Figure 2).
This process precisely machines the end face groove through rotary motion, ensuring dimensional accuracy and precision.
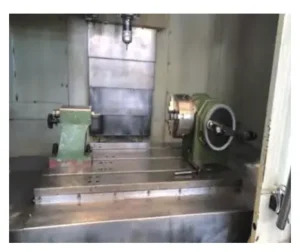
After completing the end face groove, operators transfer the cylinder barrel component to a CNC machining center.
They manually clamp the workpiece onto a manual indexing plate and level it using a height gauge to ensure precise positioning.
Next, the CNC tool machines the first damping hole.
After finishing the first damping hole, operators manually rotate the workpiece 180° to align it precisely with the tool, ultimately completing the machining of the second damping hole (see Figure 3).
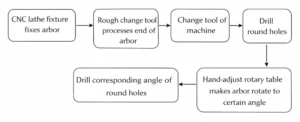
The second approach, as shown in Figure 4, involves CNC machining of the end face groove and damping holes.
This method utilizes CNC equipment for processing.
First, operators vertically clamp the cylinder barrel workpiece onto the CNC machining center using a three-jaw chuck.
Next, they use a Φ10 milling cutter for Z-axis layered machining to complete the end-face groove on the cylinder barrel.
This process ensures the groove’s dimensions and shape meet design specifications through precise control of the tool path.
After groove machining, operators transfer the workpiece to a manual indexing plate for clamping and adjust it horizontally using a height gauge to guarantee accurate positioning within the CNC machining center.
Next, the CNC tools machine the first damping hole. Upon completion, operators manually rotate the workpiece 180° to set it to the required angle.
This final step completes the machining of the second damping hole.
This process ensures machining accuracy and consistency of the damping holes through precise control by the CNC system.
Although operators have used traditional machining processes for the end-face grooves and curved damping holes of rotary cylinders, these methods still present numerous limitations.
First, traditional machining relies on manual operation, making it difficult to effectively ensure precision and consistency during the process, which leads to unstable and fluctuating product quality.
Second, manually supporting workpieces and adjusting rotation angles is not only inefficient but also prone to errors during manual rotation, increasing safety hazards in the machining process.
Finally, frequent manual intervention and the need to change fixtures and machine tools prolong processing time and reduce production efficiency.
These issues become particularly pronounced in high-volume production environments, limiting production scale expansion and market responsiveness.
Therefore, addressing these challenges necessitates the design of a new automated, high-precision, and high-efficiency machining method.
Manufacturers require this approach to meet modern demands for efficient, low-cost, and high-quality products.
To address these challenges, engineers propose a processing solution that integrates CNC machine tools with flexible automated fixtures.
This approach completes two machining operations with a single setup, significantly enhancing automation levels and reducing manual intervention.
Through automated clamping, rotation, and support, it achieves efficient, precise machining while ensuring consistent product quality.
Additionally, the flexible automated fixture adapts to cylinders of varying specifications, accommodating diverse production requirements.
This further enhances production efficiency and machining precision.
Fixture Design
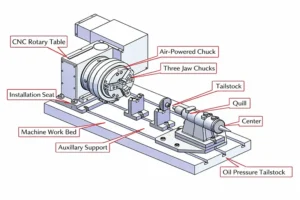
To address the machining challenges of rotating long-shaft cylinder barrel components, this paper presents an automated cylinder barrel fixture (see Figure 5).
This fixture design overcomes the limitations of traditional cylinder barrel machining techniques, significantly enhancing both machining efficiency and precision.
The designed cylinder fixture primarily comprises the following key components: plug fixture, auxiliary support assembly, indicator fixture, tailstock mounting base, and indexing turret assembly.
The rational coordination and innovative design of these components effectively enhance automation, precision, and versatility during cylinder machining.
Plug Fixture Design
As the cylinder barrel is a long shaft-type component, CNC machining centers typically employ a “one clamp, one pin” method to support and secure one end of the barrel.
Achieving precise machining of the horizontal end face groove presents the key technical challenge in this design.
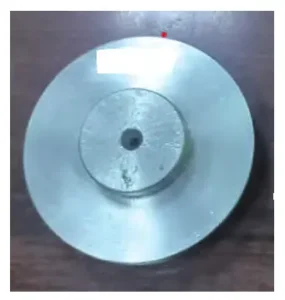
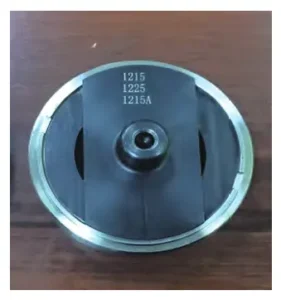
To address this, excess material is first removed from both ends of the fixture to prevent interference with the T-shaped tool.
Second, operators achieve centering by enlarging the center hole and designing its locating surface as a tapered structure (see Figures 6 and 7).
Even with assembly tolerances between the plug fixture and cylinder bore, the tailstock center can still securely hold the fixture’s guide hole, ensuring precise machining of the end face groove.
Auxiliary Support Assembly
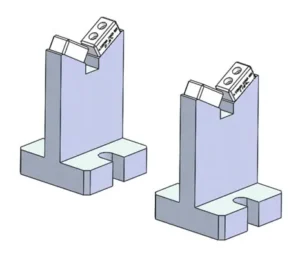
Operators position the auxiliary support assembly (see Figure 8) between the indexing turret assembly and the tailstock assembly.
Its primary function is to support the workpiece during loading, minimizing deformation caused by its own weight or machining forces.
This assembly features contact blocks made of nylon material, which effectively protects the workpiece surface from damage.
Operators maintain a 0.5 mm clearance between the center of the contact block and the workpiece to prevent dry friction with the workpiece surface.
Additionally, the contact block design allows for quick replacement to accommodate cylinder barrels of varying diameters, thereby enhancing the fixture’s versatility and flexibility.
Signage Fixture
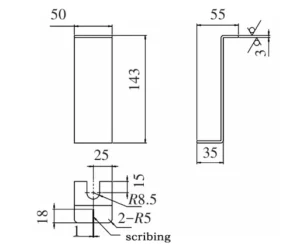
To facilitate easy identification of the vertical fixture’s orientation and prevent interference with T-shaped tools, a centerline is first marked at the fixture’s center using laser engraving technology.
Subsequently, operators secure the centerline auxiliary fixture within the machine tool using T-bolts, ensuring the fixture accurately maintains its 90° orientation.
Finally, they install an indicator plate on the fixture to prevent incorrect clamping orientation, thereby avoiding interference between the tool and the workpiece.
The schematic of the indicator plate is shown in Figure 9.
Tailstock Mounting Base
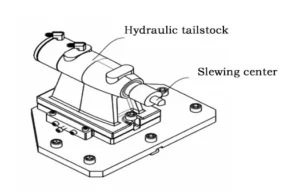
The tailstock assembly, in conjunction with the plug fixture, primarily secures one end of the cylinder barrel component, ensuring workpiece stability during rotary machining.
Traditional designs typically secure the tailstock to the machine tool platform, but for parts measuring 100 to 460 mm in length, operators can fix the tailstock using only a single screw.
To address this issue, this paper designs a tailstock mounting bracket that enables rapid adjustment of the tailstock position to accommodate machining requirements for workpieces of varying lengths (see Figure 10).
Indexing Rotary Table Assembly
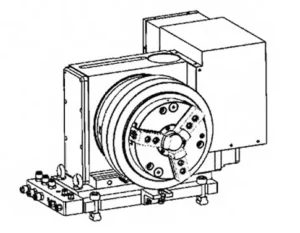
The indexing rotary table assembly enables 360° continuous rotation, facilitating multi-angle machining of workpieces (see Figure 11).
This design significantly enhances machining efficiency and quality while reducing manual intervention and alleviating operator workload.
Technical Advantages of Fixture Design and Machining Solution
Enhanced Machining Efficiency
High machining efficiency is one of the core objectives of this paper.
To achieve this goal, the introduction of flexible automatic fixtures significantly elevates the automation level of cylinder barrel machining.
This design allows operators to complete multiple machining steps during a single clamping operation, effectively reducing time lost to repeated clamping and adjustments.
The indexing turret assembly enables 360° continuous rotation, allowing the workpiece to undergo machining at multiple angles from a fixed position.
This eliminates delays caused by manual flipping and repositioning in traditional machining.
Furthermore, the automatic clamping and release functions of the pneumatic chuck and tailstock assembly minimize manual intervention, streamlining the machining process and shortening cycle times.
The introduction of auxiliary support components effectively ensures workpiece stability during machining, reducing errors and rework caused by displacement or vibration, and improving first-pass success rates.
Upon implementation, this solution achieved automated clamping and machining of the inner cylinder barrel, consolidating milling and drilling operations.
This reduced labor requirements from two operators to one, cut processing time from 45 minutes to 25 minutes, and increased machining efficiency by approximately 44%.
These innovative designs accelerate machining speed. They minimize processing errors and rework, and elevate overall production efficiency.
As a result, they meet the demands of modern manufacturing for high-efficiency, high-precision machining.
Reducing Labor Intensity
In traditional cylinder barrel machining processes, workers must perform extensive manual operations, resulting in high labor intensity.
Another key advantage of this solution is the significant reduction in physical strain on operators through flexible automated fixtures with a clamping range of 100–460 mm, minimizing repetitive and high-intensity labor.
The automatic clamping and release mechanism of the pneumatic chuck and tailstock assembly ensures workpiece clamping and positioning without manual intervention, thereby reducing physical labor.
Simultaneously, the automatic rotation function of the indexing turret assembly replaces the cumbersome manual angle-turning operation, further lowering labor intensity.
The introduction of auxiliary support components not only enhances the stability of workpiece machining but also alleviates the burden on operators during handling and adjustment processes.
Overall, this paper significantly reduces labor intensity by minimizing manual operations, improves the working environment, and enhances worker satisfaction and production safety.
Furthermore, reduced human intervention effectively lowers processing errors and product defects caused by operational mistakes, thereby further improving processing efficiency and product quality.
Enhancing Product Consistency
Ensuring consistent machining quality is a key objective of this solution.
Through precise mechanical control and automated operations, the flexible automatic chuck designed herein effectively guarantees high-standard consistency throughout every stage of cylinder barrel machining.
The 360° precision rotation capability of the indexing turret assembly ensures workpiece concentricity and symmetry at varying machining angles.
This capability minimizes dimensional errors caused by variations in manual operation.
Precise clamping force control of the pneumatic chuck and chuck jaws ensures workpiece stability during machining, preventing deformation or damage caused by uneven clamping.
The automatic telescopic centers of the tailstock assembly provide stable support, guaranteeing precise alignment at both ends of the workpiece.
The contact block design of the auxiliary support assembly reduces vibration during machining, improving surface finish quality.
These automated controls and precision operations collectively enhance product quality consistency significantly.
Simultaneously, reduced manual intervention minimizes human-induced variations, ensuring each batch maintains identical high standards.
This design meets modern manufacturing demands for high-precision, consistent products while advancing machining technology.
Compatible with Multiple Cylinder Barrel Models
With the growing demand for product diversification and customization in modern manufacturing, machining equipment capable of accommodating various specifications and dimensions has become increasingly crucial.
To address this need, the flexible automatic fixture designed in this paper achieves broad compatibility with different cylinder barrel models through its modular structure.
This flexible automatic fixture, featuring a carefully designed modular structure, enables compatibility with cylinder barrels of varying diameters and lengths.
Engineers designed the pneumatic chuck and chuck jaws for rapid adjustment and replacement.
They accommodate the clamping requirements of different cylinders without necessitating complex modifications or adjustments to the fixture itself.
Additionally, the contact blocks on the auxiliary support components are made of easily replaceable nylon material.
Operators can quickly swap them according to changes in cylinder diameter, ensuring stability during machining and effectively protecting the workpiece surface.
The tailstock assembly’s automatic telescopic centers also adjust according to cylinder length variations, ensuring precise positioning for cylinders of varying dimensions.
This high level of compatibility not only enhances fixture utilization efficiency and reduces production costs but also shortens new product development cycles.
It meets market demands for rapid response and diverse product offerings, enabling manufacturing enterprises to respond more flexibly to market changes and enhance their competitiveness.
New Machining Process Operation
Assembly and Debugging of Flexible Automatic Fixtures
The assembly and debugging of flexible automatic fixtures are critical steps to ensure their efficient operation.
First, verify that all components meet design specifications regarding dimensions and features.
Key components include the indexing turret assembly, clamping structure, tailstock assembly, auxiliary support components, and the worktable with guide rail system.
Each part must undergo precise measurement and inspection to guarantee accurate operation of the assembled fixture.
During assembly, operators secure the indexing turret assembly to the worktable at its designated position, while the guide rail system ensures rotational precision and smooth operation.
The clamping structure—comprising pneumatic chucks and chuck jaws—must connect correctly to the indexing turret assembly, while the pneumatic system must provide stable air supply and responsive operation.
The telescoping mechanism of the tailstock assembly’s center point requires meticulous adjustment to achieve precise clamping and release actions.
Operators adapt the contact blocks of the auxiliary support assembly to the cylinder’s diameter and securely install them to provide sufficient support force and stability.
The commissioning phase focuses on calibrating the fixture’s automated control system, including precise control of rotation angle, clamping force, and center point extension.
By simulating actual machining processes, engineers test and optimize the fixture’s response speed, stability, and precision to ensure it achieves the expected performance in real-world applications.
Experienced technicians perform the entire assembly and debugging process to guarantee the fixture’s reliability and durability, laying a solid foundation for subsequent efficient machining operations.
Cylinder Barrel Machining Process Flow
The cylinder barrel machining process flow is a critical step in ensuring machining quality and efficiency.
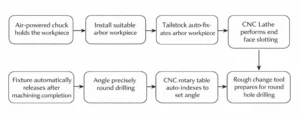
The flexible automatic fixture enhances automation and precision by optimizing the process flow (see Figure 12).
First, the cylinder barrel is placed on the auxiliary support assembly, and the dimensions of the nylon support blocks are inspected for compliance.
If unsuitable, blocks of an appropriate size are replaced. Subsequently, the workpiece is fed into the pneumatic chuck within the clamping mechanism.
The chuck automatically grips one end of the cylinder barrel to ensure stable clamping.
Next, a suitable plug fixture is selected, and the tailstock assembly is operated.
The tailstock’s center automatically secures the plug fixture, thereby supporting and fixing the other end of the cylinder barrel.
Based on this setup, the CNC machine uses a T-shaped milling cutter to complete the machining of the end face groove on the cylinder barrel.
After this operation, the CNC machine switches to the damping hole machining process.
Following the machining program, the automated indexing rotary table automatically rotates the workpiece to the required angle for precise machining.
When changing machining angles, the CNC system controls the indexing rotary table for automatic rotation without manual intervention, ensuring continuous, accurate multi-angle machining.
Upon completion, the CNC system commands the chuck jaws to release the workpiece and the centers to retract, concluding the entire machining process.
This fully automated process flow—spanning clamping, machining, and unloading—significantly reduces manual labor, lowers work intensity, and enhances both machining efficiency and precision.
Furthermore, the process offers high flexibility and adaptability, accommodating the machining requirements of cylinders with varying specifications to meet diverse production demands.
This design delivers an efficient, precise, and flexible solution for cylinder machining, advancing the modernization of manufacturing processes.
Case Study of Practical Application
In practical application testing, the flexible automatic fixture and new machining solution designed in this paper were successfully applied to the machining of inner cylinders for gas-oil springs.
These springs are core components of heavy-duty vehicle chassis suspension systems.
Through actual production operations, this machining method demonstrated significant advantages in enhancing processing efficiency, reducing labor intensity, and improving product quality.
During application, the fixture reliably clamped cylinders of varying lengths and diameters.
Automated control enabled precise angular rotation and machining, effectively minimizing errors introduced by manual operation.
For instance, in a specific production run, this fixture and machining solution processed a batch of gas-oil spring inner cylinders.
Compared to traditional methods, processing time was reduced by approximately 30%, while first-pass yield increased by over 20%, significantly boosting production efficiency and product quality.
Furthermore, reduced manual intervention substantially decreased worker labor intensity and significantly lowered the risk of workplace injuries.
The fixture’s implementation not only elevated the automation level of the production line but also laid a solid foundation for subsequent intelligent upgrades.
Conclusion
The research findings in this paper highlight the innovative application of flexible automatic fixtures in cylinder barrel machining and their significant benefits.
By developing a flexible automatic fixture adaptable to multiple cylinder barrel varieties, automation in the machining process was successfully achieved.
This approach substantially enhanced processing efficiency and product quality.
The fixture’s design emphasizes operational simplicity, ease of maintenance, and high compatibility, enabling it to accommodate cylinders of varying sizes and shapes to meet diverse machining requirements.
Compared to traditional manual operations, this fixture reduces machining time by approximately 30% and increases product pass rate by over 20%, substantially lowering production costs and labor intensity.
Furthermore, its implementation elevates the automation level of production lines, providing robust support for enterprises’ intelligent upgrades.
This achievement demonstrates not only theoretical innovation but also outstanding practical results, advancing cylinder processing technology and exhibiting strong market application potential and promotional value.
