Nitriding diffuses nitrogen into a workpiece’s surface to form nitrides, improving hardness, wear resistance, fatigue resistance, and anti-seizing performance.
After gas nitriding, surface hardness can reach 1000 HV (≈70 HRC) under a 50 N load and remain high even at 600 °C.
The process also generates high residual compressive stress, greatly increasing fatigue strength beyond that of other chemical heat treatments.
Nitriding methods include gas nitriding, liquid nitriding, and ion nitriding. Our company primarily employs gas nitriding.
Gas nitriding offers easier control, cleaner operation, and more consistent results than liquid nitriding, so manufacturers widely use it.
Common nitriding materials include 18Cr2Ni4WA, 38CrMoAlA, 40CrNiMoA, 25Cr3MoA, S106, S132, 1Cr11Ni2W2MoV, 17-4PH, TM210A, 15-5PH, and PH13-8Mo, typically used for wear-resistant parts such as joints, supports, and rocker arms.
Nitriding includes overall and localized types, and design should avoid localized nitriding. If it is necessary, apply one of the following anti-diffusion measures:
- Reserve machining allowances exceeding twice the nitriding depth.
- Apply a 0.003–0.015 mm thick tin coating.
- Apply a pore-free copper layer with a thickness of 0.02 mm or greater.
- Apply a nickel layer with a thickness of 0.02–0.04 mm.
- Apply anti-nitriding coating by brush.
Pre-nitriding roughness should meet drawings, typically Ra 0.4–0.8 μm. Surfaces must be clean, oil-free, rust-free, intact, and free of sharp edges.
Machining allowances must meet process requirements; grinding allowance per side for nitrided parts is typically ≤0.05 mm.
Nitriding occurs at 460–650 °C, and strict atmosphere control is essential to prevent defects like shallow depth, reticular layers, or loose compounds.
Nitriding avoids post-processes like quenching, keeping deformation minimal—especially beneficial for parts needing no further machining.
Dimensional instability in nitrided parts is mainly due to microstructural changes, residual stresses, and microplastic deformation.
Surface deformation is roughly 1/10 of the nitrided layer thickness and increases with layer thickness.
Process planning must account for deformation; tight-tolerance dimensions require finishing after nitriding.
Analysis of Machining Challenges for Connecting Shaft Components
Figure 1 shows a connecting shaft that transmits swashplate torque to the sensor in hydraulic motor feedback devices.
The 0Cr17Ni4Cu4Nb part needs φ10/φ3.5 OD surfaces nitrided 0.1–0.3 mm ≥58 HRC; core 31–39 HRC; grooves polished R0.1–0.2 mm.
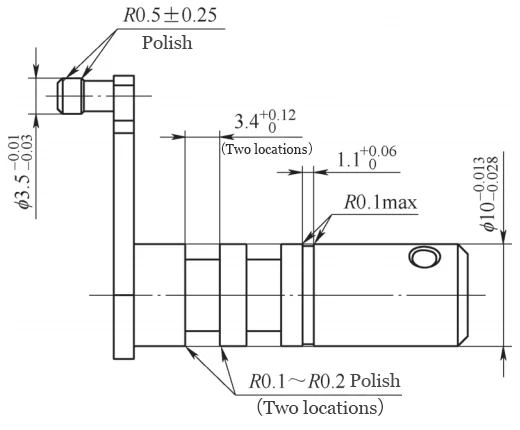
The hardness and brittleness of nitrided surfaces make machining and transitions prone to edge chipping, requiring careful process planning.
Selection of Finishing Methods
The nitrided surface is hard, strong, brittle, wear- and corrosion-resistant, chemically stable, but poorly machinable.
As a hard, brittle material, improper machining can damage the nitrided layer, making high-quality machining a major challenge.
Machining of nitrided surfaces uses turning, milling, and grinding, with PCBN inserts providing ideal hardness, heat resistance, toughness, and chemical stability.
Tool paths should feed from the periphery to the core, not the reverse, though edge chipping may still occur.
Prioritize grinding where possible; avoid overly hard wheels to prevent thermal stresses and cracks.
White fused alumina wheels cut better and outperform single-crystal alumina but are less tough and shed grains easily.
External cylindrical grinding can be longitudinal or transverse; longitudinal grinding is slower but gives better surface quality.
while cross grinding offers higher efficiency but generates greater grinding forces and temperatures, necessitating ample coolant supply during operation.
Machiners prefer longitudinal grinding for nitrided surfaces because it improves heat dissipation and reduces cracking, despite lower efficiency.
Process Flow
Stainless steel nitrided parts require staged processing, anti-nitriding measures, and stress relief to prevent deformation.
Prioritize grinding for nitrided surfaces to induce compressive stresses and preserve integrity better than turning or milling.
The process flow is typically divided into the following stages:
- Blank Forming: The blank is a forging or bar stock.
- Rough Machining: Remove substantial excess material.
- Solution Treatment and Precipitation Hardening: Ensure hardness requirements for non-nitrided surfaces.
- Semi-Finish Machining: Remove heat-treated surface scale, leaving a small allowance for finish machining.
- Stress relief should follow rough or semi-finish machining for complex or thin-walled parts, retaining enough allowance to minimize deformation during nitriding.
- Copper Plating: Copper plating provides protection, with an overall thickness of 30–50μm.
- Semi-Finishing: Remove the copper layer from the nitriding surface and complete machining of surfaces to be nitrided.
- Gas nitriding is done on the surface, leaving a grinding allowance for precise or deformation-prone parts to be removed afterward.
- Copper Removal: Eliminate all copper layers from the part surface.
- Finishing: Perform precision machining on nitrided surfaces and critical dimensions.
Pre-Optimization Machining Process and Existing Issues
The primary machining sequence for connecting shafts prior to process optimization was:
Post-grinding, R0.15 mm and R0.5 mm fillets are incomplete; polishing risks tolerance breaches or severe edge chipping.
The OD annular groove slightly deforms after nitriding; machining it to final dimensions beforehand causes shrinkage and dimensional deviations.
Optimized Process Plan
- Optimization Method for φ10mm Outer Circle
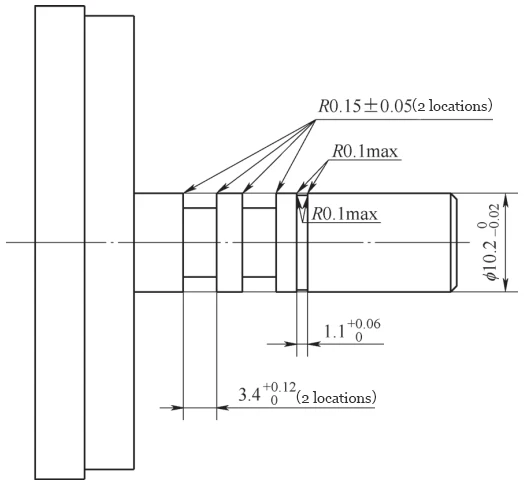
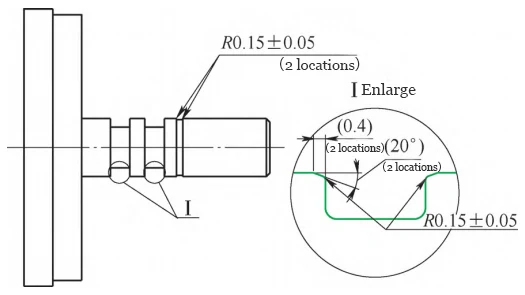
A 10°–20° tapered transition with a rounded corner is added between the φ10 mm OD and seal groove to preserve edge radii and prevent chipping.
Verification shows the tapered transition fully prevents chipping, ensuring machining quality.
The CNC-turned OD and seal groove before improvement are shown in Figure 2, while Figure 3 illustrates the seal groove edge after geometric treatment.
- Optimization Method for φ5mm Outer Diameter
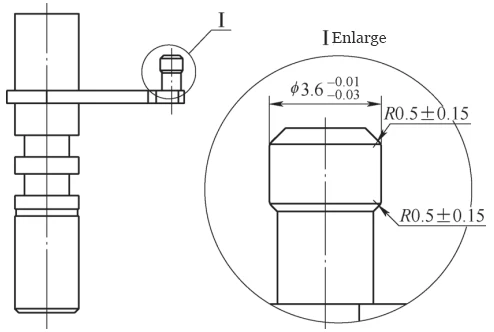
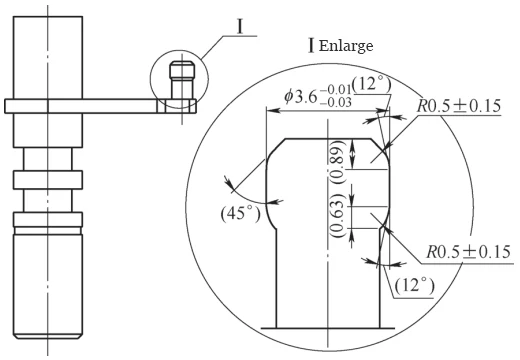
The φ5 mm OD has a 12° taper at R0.5 mm, smoothing the transition and preventing edge chipping during φ3.5 mm OD grinding.
The geometric treatment of the φ 3.6mm cylindrical fillet before and after process improvement is shown in Figures 4 and 5, respectively.
- Sealing groove deformation compensation
Sealing groove edges shrink from nitriding-induced expansion, with high-nitrogen areas expanding more.
The 3.4 mm seal and 1.1 mm retaining ring grooves’ tolerances were adjusted pre-nitriding to ensure final dimensions (see Table 1).
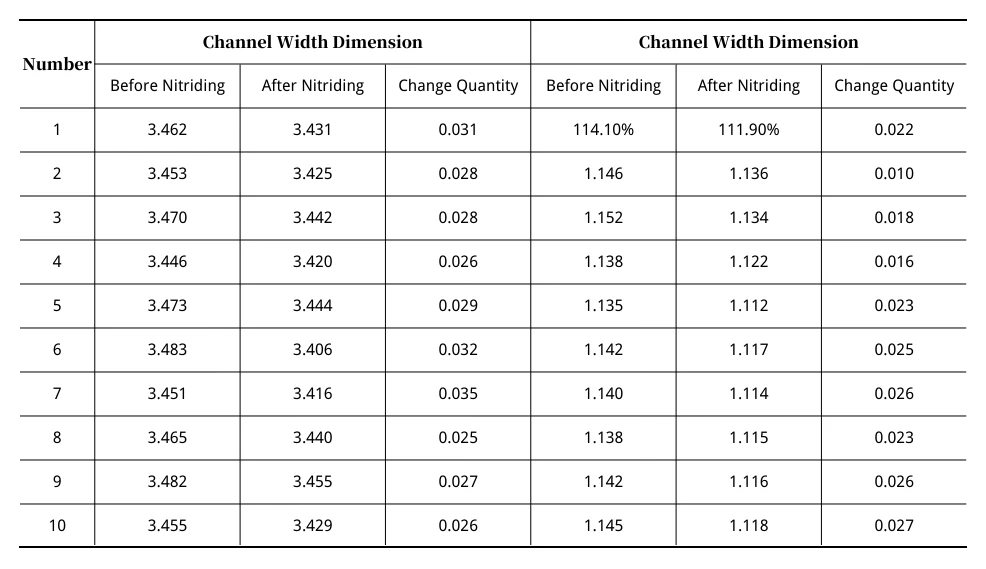
Table 1 shows the 3.4 mm groove width changes 0.026–0.035 mm after nitriding, so pre-nitriding tolerance is set to 3.4 (+0.12/+0.04) mm.
For the slot width dimension of 1.1 (+0.06/0) mm, the variation before and after nitriding was 0.010–0.027 mm. Consequently, the pre-nitriding slot width tolerance was reduced to 1.1 (+0.06/+0.03) mm.
After applying the reduced tolerances, all final slot width dimensions of the components met specifications.
Conclusion
Nitrided surfaces are hard, wear-resistant, and perform well at high temperatures, making stainless steel components widely used in aerospace engines.
Machining nitrided surfaces is challenging, requiring durable tools, precise cutting parameters, and careful toolpath planning.
Adding tapered transitions and tightening pre-nitriding tolerances solved edge chipping, groove shrinkage, and low machining efficiency in stainless steel parts.
The part qualification rate improved from approximately 50% before the modification to 100%, achieving excellent results.

